Cooling the RX888KMII
The (out of the package) radio is passively cooled with three cooling blocks. One on the bottom and two at the sides. This should be enough, but several users reported that on the 130MS/S high sample rate the unit gets very hot. On the lower rate about 65 MS/S, the unit is getting also pretty hot. So the inside components are getting even hotter, so we decided to improve the cooling.
- Remove the front and back screws from the covers.
- Remove the covers.
- Slide the pcb very gentle out of the box. Be careful for the heat conducting piece of hard gel, which is kind of sticky. This is used to
take away the heat of the AD-convertor and conduct that to the aluminum cover.
- Drill a lot of small holes in the top and bottom of the box.Not to many otherwise the box is to weak. Make it all smooth so we can
glue two 50mm 5V fans to the cover at the outside. One at the bottom, one at the top. Make sure the fans BLOW into the unit,
right on the pcb. Check the smooth movements of the blades of the fans.
- Than make a 5mm hole in the side cover with the usb connector, to install a sma connector, see the previous page (here). Look
carefully where the hole will be, because there is not to much place for that !.
- Drill more small holes in the front and back covers for letting out the air blown in by the fans.
- Connect the MHF plug to the connector on the pcb and slide the pcb back to his place
- put everything back together again, and don't forget the screws.
We have now a GPS freq controlled radio with sufficient cooling for 24/7 operation. Cool !

We also tried a very, very effective cooling for environments where the temperature can go up rapidly in the summer.
This way is used in our WebSDR 'to be sure'. But it is kind of overkill.
It works like this:
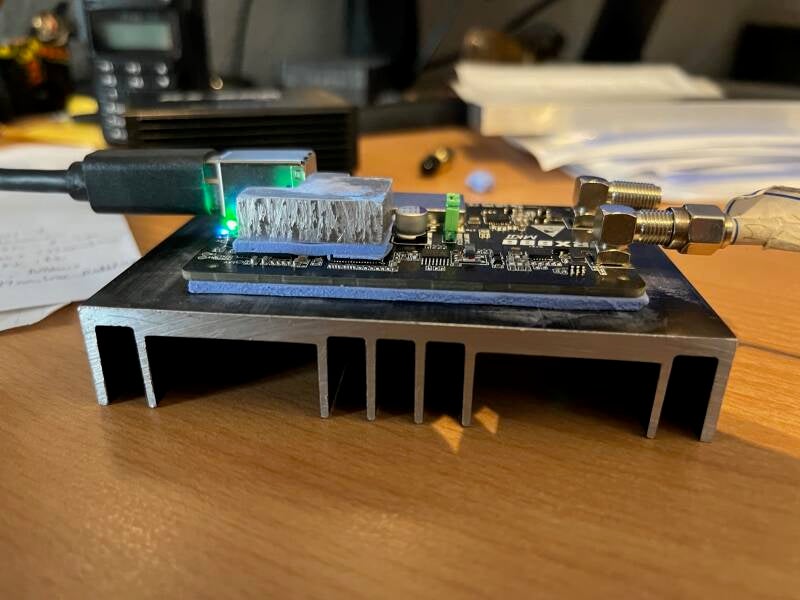
- remove the pcb from the housing
- buy two cooling blocks
- put one on the table with the flat part up
- make sure it is flat, a little sanding could help
- put a 2mm thermal silicon pad over the cooling block (it has to be thick enough to make sure no shortages are created between the pcb and the cooling block.
- put the pcb on it and push gently to make sure there is thermal contact between pcb and block
- put both sides of the original housing with the connectors back to its place, mounting it with long 3mm screw ends. Don't forget to make the sma connector hole.
- make a Alu block of 6-8mm thick which fits exactly over the both big chips (AD convertor and USB chip) and the two voltage convertors (they get very hot !).
- put the Alu block over the chips with silicon pad in between.
- then again a small piece of silicon pad over the Alu block
- and put a second cooling block over it, making sure that is has thermal contact with the Alu block (cooling fins up!)
- secure the second cooling block to the first by securing it with aluminum plates.
- make sure all new housing parts are grounded. I removed the black coating with sanding paper and made connections with little alu plates
If needed a fan can blow air through the cooling blocks.
My experience with this way of cooling is that the cooling blocks only rise a few degrees Celsius, after starting the RX888MKII. And I tested for a few weeks, and the RX888MKII worked uninterrupted.
The pad:


Create Your Own Website With JouwWeb